Stone Ocean - Episode 10
Operation Savage Garden (Head to the Courtyard!), Part 1 (サヴェジ・ガーデン作戦(中庭へ向かえ!) その①, Saveji Gāden Sakusen (Nakaniwa e Mukae!) Sono 1)[2] is the tenth episode of Stone Ocean and the 162nd episode of JoJo's Bizarre Adventure: The Animation. The episode covers Chapter 40 through a few pages in Chapter 43 and a scene from Chapter 24 of the original manga.
Assisted by Emporio and his friend Weather Report, Jolyne rushes to the courtyard to pass Jotaro's Stand DISC to the Speedwagon Foundation.
Summary

Pucci is seen reflecting alone in his office. He's erased all traces of his presence in Miraschon's memory DISC. Reflecting that humans are defined by their will to go to Heaven, Pucci thinks that they should consecrate their time to seek Heaven as he crushes an ant with a finger.
After retrieving Jotaro's Stand DISC from Whitesnake's DISC stash and secured it, Jolyne now heads to the prison telephones. Just as one of the inmates prepares the pick up the phone, Jolyne taps on her shoulder to tell her to move. The inmate briefly gets angry but sees the money Jolyne's offering her and changes her attitude, making a fuss of Jolyne to please her. Jolyne thus contacts the Speedwagon Foundation. The people at the Dallas Headquarters initially decline to contact her but she presents herself and thus a representative of the foundation who is in the know about the whole affair picks up the phone.

The contact informs Jolyne that they have retrieved Jotaro Kujo's unconscious body and moved him somewhere safe but that he's presented no signs of life, which quietly shocks Jolyne. However, she offers a way to revive him as she's retrieved one of the DISCs stolen from him and asks the Foundation to figure out a way to quickly extract the DISC. The representative asks if the conversation could be being wiretapped, something Jolyne confirms, stressing that her enemies will move as soon as they learn about this call. The contact asks if Jolyne can access the courtyard between the men and the women's wards and tells her to be there in twenty minutes due to the urgency of the situation. The representative makes it clear that they cannot assist her or help her escape but Jolyne accepts the operation. Unwilling to divulgue the plan in detail, the representative only tells her to look for Savage Garden and hangs up, leaving Jolyne puzzled about the nature of this "Savage Garden". As she hangs up the phone, Jolyne tries to visualize the path she needs to take to reach the courtyard.

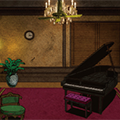
Jolyne bribes her way through part of the prison when suddenly, Emporio calls for her. Jolyne meets Emporio in one of the staircases of the prison and Emporio tosses his baseball towards Jolyne, the ball flying through her. Astonished, Jolyne turns her head only to see Emporio inside of a crack in the wall, his whole body seemingly flattened. Emporio then drags Jolyne inside of the crack. There, Jolyne finds herself in a room with various pieces of furnitures, from a piano to various painting or bookshelves. More importantly, two men are sitting inside and leaning against the piano, though Emporio tells Jolyne to not mind them. The pink-haired man looks at her before leaving. Emporio begins to present his secret room and describe all its details, showing that the room is actually the ghost of an old room that has burned down in 1984 and which is sustained by Emporio's own ability: Burning Down the House. However, Emporio precises that he isn't a Ghost.

Emporio chastises Jolyne for having imprudently called the Speedwagon Foundation and warns her that Whitesnake will definitely find out about it in less than twenty minutes. Jolyne asks Emporio to give her a shortcut to the courtyard but the boy tells her that there is no shortcut and that he merely hides inside of Ghost objects to traverse the prison undetected. Nonetheless, he offers his assistance. Emporio transports the group into the real music room and uses the occasion to present Weather Report, another inmate who agrees to help Jolyne reach the courtyard. Weather is amnesic with a number of eccentric habits whose memories were probably stolen by Whitesnake, hence his will to retrieve his memories and discover what is happening. Moreover, says Emporio, Weather Report has his own Stand of the same name which controls the weather. Weather thus summons a rain cloud and a gust of wind which creates a puddle of water and makes several pencil fall on the piano. The sudden sound prompts an unknown stalker to look in and the heroes see his reflection on the puddle, confirming that Whitesnake's allies are already trailing Jolyne.

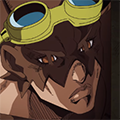
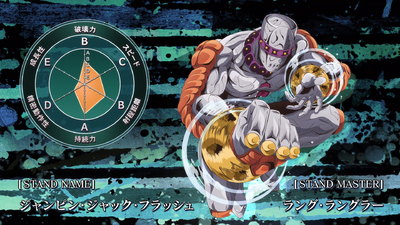
Jolyne, Emporio and Weather run to the factory with their enemy, Lang Rangler, close behind. Lang strangely walks on all fours, having suction cups on his fingertips. He manages to spit on Jolyne's pants before the heroes turn a corner, and when Lang reaches the corner too, he loses sight of them. Seemingly at a loss, Lang Rangler leaves the scene. In truth, the heroes are hiding under a prison coat. Emporio urges Jolyne to go to the courtyard immediately before Whitesnake can hear about the plan. Weather Report then whispers something in Emporio's ears, the latter explaining that Weather has told him about the guards standing in the way and the risk she incurs when she will have to force her way through. Still, Jolyne remains determined to save her father. The group thus splits up.

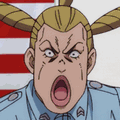
While Emporio stays behind, Weather quietly heads back to the men's ward, followed by Jolyne who has partially the same route. The factory guard who watches the corridor decides to treat himself to a soda but the drink bubbles and spills over his glass. He complains and accuses Jolyne of having touched the drink but she refutes the accusation. She slips a $50 bill under the guard's saucer and pretends she needs to have her shoe repaired. The guard quietly accepts the bribe, nonchalantly telling Jolyne to buy him another drink as he turns away. Satisfied, Jolyne prepares to leave but she notices the bill stuck on her neck. She initially mistakes it as the guard genuinely telling her to buy him a drink but then she notices that the glass and the saucer are also stuck to her. When the guard turns to look at the hallway, Jolyne has already disappeared. In reality, she's begun to float in the air alongside the saucer, glass and soda. Confused and freely drifting midair, Jolyne realizes that Lang Rangler's spit has caused her to become suspended in air. The Star Platinum DISC slips out of her pocket but when she tries to send a thread to retrieve it, she misses the DISC and becomes disorientated. She thus realizes that she's not merely floating, but as lost any sense of up or down, as she's lost her "gravitational force" and is now is a zero-gravity environment.

It is a this moment that Lang reappears and launches himself towards the DISC. Jolyne tries to send a thread more carefully, in a straight line to alleviate the loss of balance, but Lang simply blows the thread away and seizes the DISC. He tries to bend the DISC but the item refuses to bend or break, forcing Lang to keep it in his back pocket as he crawls out of sight. Jolyne grabs the glass and throws it towards the men's ward with a thread attached. Having created a makeshift string telephone, Jolyne is able to call Weather Report for help, who comes running to assist her.

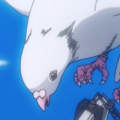
Weather sees Lang Rangler crawling on the ceiling and runs towards him to attack. Unimpressed, Lang summons his Stand, Jumpin' Jack Flash, who possesses strange rotating spherical gauntlets at the wrist. Jolyne warns Weather about the gravity loss caused by the enemy Stand just as it shoots projectiles from its wrist towards Weather. Weather summons clouds which deflect the projectiles away, showing that they are nuts, bolts and screws. Observing from afar, Jolyne tries to make sense of Weather's ability and guesses that he's created atmospheric layers to use the air resistance to deflect the attack, and guesses from the gauntlets spinning that Lang shoots his projectile via centrifugal force. Weather and Lang confront each other and prepare to exchange blows. However, Lang's arm is set aflame due to the friction with Weather's layers of air. Lang releases the zero-gravity, making a ventilator fall on Weather. The fall of the objects on the floor activates an emergency alarm in the hallway and the doors begin to close automatically. The alarm makes the plan even more difficult to fulfill for Jolyne but she expects to be able to take the DISC from Lang's hands if they're trapped together. To her surprise, Lang shoots several screws and bolts into a wall, using the recoil to propel himself away and slip into the next room. However, Weather Report grabs Jolyne, becoming weightless as well, Weather thus summons a gust of wind that also guides them to the laundry hall and they are able to reach the place before the large iron doors close on them.
Jolyne and Weather find themselves in the laundry room, a large dark hall filled with machinery blocking the view.
Appearances


Credits
Kentaro Ishikawa
Sakura Shiba
Nozomi Tachibana
Neito Hirohara
Akihiro Otake
Ryota Iwai
Ken Arto
Miharu Nagano
Tomokazu Gunji
Kenichi Umemoto
Nobuhiro Masuda
Kazumasa Takeuchi
Yoshitaka Sato
Yasunori Yamaguchi
Kimiko Tamai
Hiroshi Yoneda
Yutaka Kawasuji
Sora Kondo
Yuka Sato
Toshihiko Masuda
Kiyoshi Nochi
Shinichi Iimura
Masahiro Okamura
石川 健太郎
柴 さくら
立花 希望
廣原 寧人
大竹 晃裕
岩井 亮太
アルト 健
永野 美春
郡司 智一
梅本 賢一
増田 信博
竹内 一将
佐藤 良隆
山口 保則
玉井 公子
米田 宏
川筋 豊
近藤 大空
佐藤 夕香
増田 敏彦
能地 清
飯村 真一
岡村 正弘
Rie Ishiwatari
石渡 理衣
Miyuki Kawano
Tae Inotsume
Eiichi Morita
Mahora Muraki
Kotaro Okazaki
Midori Matsumoto
Mayumi Kowada
Emiri Kaneuchi
Atori Ozawa
Mitsuko
Kazumi Nakatsu
Cocomantot
Mahmoud Moftah
Huang Xianglin
Naoki Saito
Kushagra Kushwaha
Leondro Duarte
Seiki Kume
Eniku Okazaki
Mami Takaishi
Ryoma Hattori
Theodore Nance Van Zalm
Kaichi Baba
Tai Ruixin
河野 美由紀
猪爪 多恵
森田 映一
村木 麻保良
岡崎 耕太郎
松本 緑
古和田 真弓
金内 恵美里
尾沢 あとり
蜜子
中津 和美
Cocomantot
Mahmoud Moftah
黄 翔麟
齋藤 直貴
クシュワハクシャグラ
Leondro Duarte
久米 晴希
岡崎 円郁
高石 まみ
服部 涼真
Theodore Nance Van Zalm
馬場 海地
熊 睿鑫
EKACHI EPILKA (エカチエピルカ)
Manop Jangsataen
Chalermpol Inlom
Manop Jangsataen
Chalermpol Inlom
Liden Films Kyoto (ライデンフィルム京都)
Nakamura Production
Reboot
Rad Plus
Triple A
中村プロダクション
reboot
Rad Plus
Triple A
Kyoka Nanji
南治 京花
Reboot
Rad Plus
reboot
Rad Plus
Yudai Ueno
Kiyoshi Hara
Kengo Nakatani
Akira Suzuki
上野 雄大
原 聖
中谷 謙吾
鈴木 朗
Tatsuki Ishida
Atsuhiko Ikezoe
石田 龍樹
池添 敦彦
CG Modeling Cooperation
Studio51 & Tenjoy Studio
(Studio51株式会社&禾津禾匠動画科技有限公司)
Momo Huang
Zhengyang Wang
Xu Hong
黄 濛濛
王 正陽
許 紅
Music
| Stone Ocean Episode 10: Operation Savage Garden (Head to the Courtyard!), Part 1 | ||||||||||||||||||||||||||||||||||||||||||||||||||||||||||||||||||||||||||||||||||||||||||||||||||||
|---|---|---|---|---|---|---|---|---|---|---|---|---|---|---|---|---|---|---|---|---|---|---|---|---|---|---|---|---|---|---|---|---|---|---|---|---|---|---|---|---|---|---|---|---|---|---|---|---|---|---|---|---|---|---|---|---|---|---|---|---|---|---|---|---|---|---|---|---|---|---|---|---|---|---|---|---|---|---|---|---|---|---|---|---|---|---|---|---|---|---|---|---|---|---|---|---|---|---|---|---|
| ||||||||||||||||||||||||||||||||||||||||||||||||||||||||||||||||||||||||||||||||||||||||||||||||||||
|
| ||||||||||||||||||||||||||||||||||||||||||||||||||||||||||||||||||||||||||||||||||||||||||||||||||||
Manga/Anime Differences
- Added a scene of Pucci monologuing.
- Shortened the narration's explication of the prison store to a short scene showing inmates buying things.
- Added 7 real book titles to the store, whose covers, author names and titles are slightly altered:
- Apollo's Angels by Jennifer Homans, titled "Artemis's Angels".
- The Emperor of All Maladies by Siddhartha Mukherjee, titled "The Queen of All Maladies".
- A Visit from the Goon Squad by Jennifer Egan, titled "A Visit from the 4th Squad".
- Finishing the Hat by Stephen Sondheim, titled "Finishing the Cat".
- The New Yorker Stories by Ann Beattie.
- The Warmth of Other Suns by Isabel Wilkerson.
- Cleopatra: A Life by Stacy Schiff.
- Added shots of Jolyne's planned path through the prison.
- Added a scene of Jolyne interacting with the guard from the body check.
- Added a scene of Jolyne finding herself in Burning Down the House's ghost room and meeting Weather and Anasui. The scene actually copies the original scene where Ermes was the one meeting Weather and Anasui.
- There are a few additions and changes to this scene, namely that Anasui is drawn in his revisioned design, and we also see him exit the room.
- Although it was originally absent in the manga, the weird graffiti that F.F. mentions during her recollection in SO Chapter 85 was added to the public phone.
- Shortened the scene of Emporio planning Jolyne's access to the courtyard.
- The factory guard's drink is changed from Pepsi to Coca-Cola.
- Shortened a scene of Jolyne's despairing to take back Jotaro's Stand DISC.
In Other Languages
| Language | Title | Translation |
|---|---|---|
| サヴェジ・ガーデン作戦(中庭へ向かえ!) その① | Operation Savage Garden (Head to the Courtyard!), Part 1 | |
| Operation Savage Guardian (Head to the Courtyard!), Part 1 | ||
| Operation: Wilder Wächter (Geh in den Hof!): Teil 1 | Operation: Wild Guardian (Head to the Courtyard!): Part 1 | |
מבצע שומר פראי (הגיעו לחצר!) (1) |
Operation Savage Guardian (Get to the Courtyard!) (1) | |
| Operacja: "Brutalny strażnik": część 1 | Operation "Brutal Guardian": Part 1 |
Gallery
-
 Jumpin' Jack Flash Eyecatch

Trivia
- The guard's saucer is of the "Nyritake" brand, a reference to the real-life Noritake tableware and technology company.
