Phantom Blood PS2 Modding Info
This modding guide for the PlayStation 2 game Phantom Blood is primarily written with the assumption that the end user will be running Windows, as several of the programs involved do not work or have not been tested on other operating systems.
How to Play the Game
JoJo's Bizarre Adventure: Phantom Blood (ジョジョの奇妙な冒険 ファントムブラッド, JoJo no Kimyō na Bōken Fantomu Buraddo) tells the story of Jonathan Joestar, the virtuous son of an English nobleman, and Dio Brando, his adoptive brother with limitless ambition and malice. When the latter dons an ancient stone mask that transforms him into a bloodthirsty vampire, Jonathan is forced to master the art of the Ripple to destroy him before he conquers the world.
弱攻撃
強攻撃
回避
波紋の呼吸
カメラ操作
チャージ攻撃
ガード
覚醒発動 (lit. "Activate Awakening")
ターゲット (lit. "Target")
ポーズ
If all of this comes as a revelation to you, strap in.
Getting Started
To begin modding Phantom Blood, you will need a backup of the game disc, ideally stored as an ISO file or in a similar format. No matter which aspects of the game you want to mod, you will also need a hex editor such as HxD (free) or 010 Editor (paid). In addition, obtaining a PS2 emulator such as PCSX2 can be helpful for testing mods quickly.
Host Filesystem
Under normal circumstances, an ISO editor would be necessary to access the files within the game backup. However, by extracting the files and editing the game's executable files to redirect file locations and bypass disc sanity checks, it is possible to run the game on the host filesystem. Doing so allows files to be easily altered or replaced, even while the game is running, and also improves the game's load times.
An IPS patch compatible with any retail executable can be found here and applied with any IPS ROM patcher. Note that after extracting files and patching the executable, you will need to enable Host Filesystem, which can be found in PCSX2's emulation settings menu. Finally, just for convenience, it is advised that you append the ".ELF" file extension to the modified executable, to allow for easier selection or detection from the emulator.
FILELINK.BIN Editing
Phantom Blood uses a specialized data storage method developed by CRI Middleware and ostensibly powered by ADX technology, which is known only as FILELINK.BIN.[a] All of the game's data and graphics files are stored within FILELINK.BIN, albeit compressed via the zlib algorithm. To unpack FILELINK.BIN, the use of QuickBMS with a specialized script is required. Upon running the program, you should be prompted for a BMS script file; if it does not, you may have to grant the program administrator privileges. When prompted, select the filelink BMS script, the input file (FILELINK.BIN), and an output folder, in that order. The program should then be able to extract the files within FILELINK to the output folder. Due to a lack of folder names, the resulting folders will be numbered 0-34, skipping empty folders 30-32.

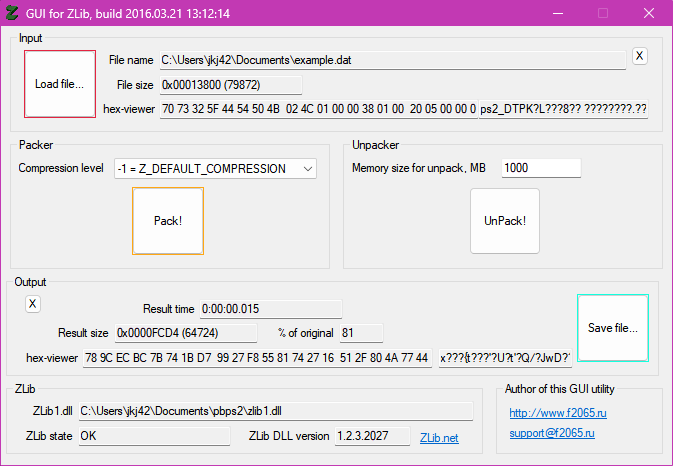
The only currently-known method of replacing files within FILELINK.BIN is by doing so manually. For this, ZLib GUI is required. Open ZLib GUI and click "Load file..." to select the desired file to compress. In most cases, the default compression level (-1, approximately equivalent to level 6) will suffice for the space allocated to the file, but it may be necessary to set it to a higher level: to do so, select the desired level from the "Compression level" dropdown at the left of the window. Click "Pack!" to compress the file, and then click "Save file..." at the bottom-right corner of the window to export the compressed file. Next, open the unmodified file in ZLib GUI. If necessary, set the compression level back to -1, then click "Pack!" once more. The first few bytes of the compressed file will appear in the "hex-viewer" box near the bottom of the window; select and copy these, then search for them in FILELINK.BIN via your hex editor. Upon finding a match, open your compressed modified file, copy the entirety of its data, and paste it into FILELINK over the compressed original. Depending on the file, two to three results may appear, representing duplicates; in these cases, repeat the process for each result. All that remains afterward is to save the file.
Overlay Editing
In order to edit textures, you will need a program called Rainbow, which can open TIM2 files, as well as a specialized image conversion script. In addition, you will need Python 3.7 installed for the script to function.
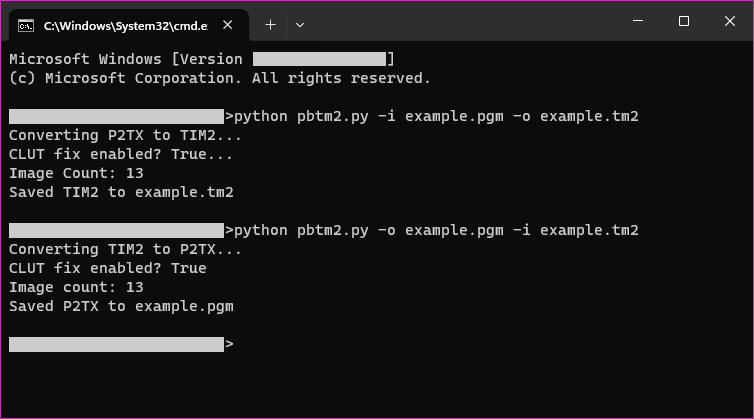
Phantom Blood uses overlays to construct its 2D rendering layer, which it uses for everything that is not a 3D model. These overlays are usually stored within files labeled with the extension PGM,[b] though some are included in BTR files used for battle overlays. Start by locating the PGM or BTR file you want to edit: TIM2 bitmap graphics are roughly visible in a hex editor at the appropriate width, usually 128 or 256 bytes. Once you find the appropriate graphics file, open a console window and type py p2tx.py -i [input file] -o [output file]; drag and drop your file onto the console window to provide the input file, and make sure your output filename has the extension "tm2". After running the command, a new TM2 file should be created, which can then be opened and exported to PNG in Rainbow. If the system does not recognize the "py" command, replace it with the "python" command.

Edit each image however you want, then re-import the images into rainbow via their respective XML files and save the output TM2 file. After making a backup of the original graphics file, return to the console window and use the same command as before, except with the input and output files swapped. Doing this should result in an updated PGM or BTR file, which can then be reinserted into FILELINK.BIN following the above process.
Currently, there is no convenient method of editing the accompanying DAT file,[c] which controls the positions, UVs (rendered areas), and effects for overlays.
SOUND.AFS Editing
You will need MF Audio to edit voice clip and sound effect files; Audacity, its FFmpeg extension, and ADX Encoder are required to edit music, cutscene audio, and character dialogue.
All of the audio files used in Phantom Blood are stored in DATA/SOUND/SOUND.AFS. While AFS, fortunately, is a standard format for PlayStation 2 games, and can easily be edited with AFSExplorer, the variant used in the game contains entirely zeroed-out file entries within its header, causing the program to misattribute the sizes of each file. A modified version of the file available here provides metadata for these entries, allowing the file to be correctly interpreted by both the game and AFSExplorer.
After applying the provided fix and downloading AFSExplorer, launch the application, open the "File" dropdown, and either open the extracted SOUND.AFS file or use the "Import AFS file from CD image..." option to access the disc image directly. Right-clicking a file will provide options to "Export" the original file, "Import" a modified file, or open the file in an external hex, texture, or sound editor that you can specify in the "Configuration..." option under File.
Not Enough Space Error
If your modified file is bigger than the original, you'll likely get an error message saying there's not enough room for it. This is because each file in the AFS archive has a very specific amount of space assigned to it. If AFS Explorer asks you to auto-arrange the files, select "No". Auto-arranging files is known to break the file and make it unable to be read by the game. A new window will appear asking if you want to set a new reserved space. While this allows the program to automatically determine the correct size to allocate for the file, user action is still required afterward. After selecting either option, close the last error window that pops up, then press Ctrl and R simultaneously. Doing so will bring up a menu where you can modify the reserved space for every file. If you allowed AFSExplorer to set a reserved space, the size allocated to the file in question here should match your modified file's size; if not, select the file and then press or hold the "+" button until the size in bytes can fit your modded file. Now click "Regenerate AFS" and save the edited AFS. Note that doing this will not result in the modified file being added to the newly-created AFS, so you will have to open the AFS and import the file yourself afterward.
Assuming you are not using the host filesystem, you must now put the new AFS file into the ISO. Simply using AFS Explorer's insert option won't work here, since inserting a file of a different size requires rebuilding (and consequently breaking) the ISO. Instead, use a program that can open and save ISOs directly, such as isomod. Upon downloading and opening isomod, you will see three fields. Browse to and select your ISO for the first field, then type the name of the AFS you're replacing in the field below it. For the third field, browse to and open the regenerated AFS file. After all three fields have been filled, press "Import!", and the program will insert the regenerated AFS file into the ISO.
Sound Effect and Voice Clip Editing
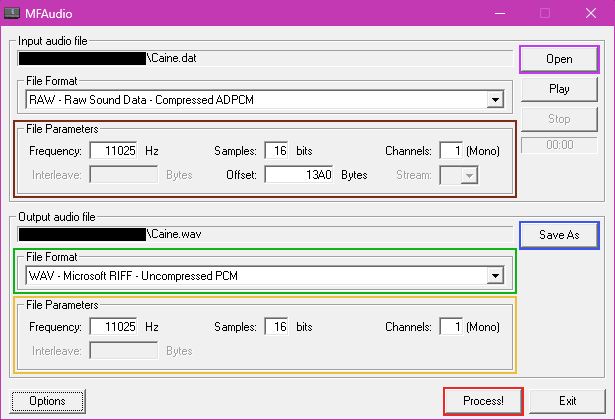
Upon opening SOUND.AFS, you will see several DAT files. Right-click the file you want to edit and select "Export", then save it wherever you want. Finding sounds within the file itself must be done manually, as no program designed to support these files in particular exists. To begin, open MFAudio and click Open, then select your extracted file. In the parameters below the file path and format, set "Channels" to 1 and "Frequency" to 24000 (except in the case of sound effects, which use 22050). Next, open the file in a hex editor and search for every instance of sixteen consecutive bytes of zeroes, which designate the beginning of an audio clip. Input each of these positions into the "Offset" parameter in MFAudio and click "Play" to test each of these audio clips one-by-one until you find the one you wish to edit. When you find the clip you want to edit, select WAV for the output's File Format, set the output "Frequency" and "Channels" parameters to match the input, and click Save As to select a location and name for the output. Finally, click Process! to extract the sound file.

When you're finished editing, export your audio as a mono 16-bit WAV file. Make sure that your edited file remains the same length or shorter than the file you are replacing. Once the audio file is exported, open the exported WAV file in MFAudio, change the output File Format to "Raw Sound Data - Compressed ADPCM", set the output parameters to be the same as the previous input parameters, and select an output location and name before clicking Process!. MFAudio should convert your new WAV file into a RAW file in the same audio format as the original sound. Next, return to the hex editor, open your RAW file, and locate the position you found the audio clip at within the DAT file. Copy and paste the entire data of your RAW file over the original data, and fill the remainder with bytes of zeroes. Finally, save the DAT file and reimport it into SOUND.AFS.
Streamed Audio Editing
Scrolling further within SOUND.AFS, you will see hundreds of ADX files. Once you find the file you want to edit, export the file. With the FFmpeg extension installed (refer to the installation instructions on Audacity's website), Audacity is capable of opening and exporting ADX files natively, but does not support looping in any capacity. Thus, if your only goal is to edit non-looping audio (dialogue and cutscene audio), Audacity alone will suffice for converting to and from the format. There are a few things to keep in mind, however: due to a bug in the current version of Audacity, you will need to export your tracks with the "(external program)" format, with the command set to ffmpeg -i - "%f.adx". In addition, be careful to specify the correct sample rate in the export options menu.
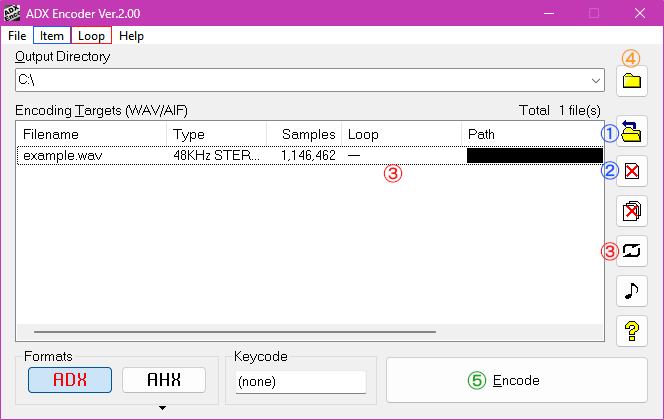
In order to add loop points to your custom ADX file (important if you are editing music), you will need ADX Encoder. Upon opening the program, you will be presented with the following GUI:

- Import: Clicking the button displaying a folder and an arrow, pressing Insert, or selecting "Item->Add" in the window dropdown will allow you to select a WAV file to be converted. The selected WAV file will appear in the list, along with its sample rate, number of audio channels, and number of samples.
- Remove: Clicking the button displaying a red X over a file icon, pressing Delete, or selecting "Item->Delete" in the window dropdown will remove the highlighted WAV file from the list.
- Loop: Double-clicking a file in the list, clicking the button displaying a pair of arrows, pressing L, or selecting "Loop->Loop Settings..." in the window dropdown will allow you to set the loop information for the created ADX. You can choose to disable looping, have the file loop from the start of the audio to the end, or set loop points by sample number. The sample numbers of a given position or selection can be viewed in Audacity by clicking the arrow to the right of either value in the "Selection" panel at the bottom of the window, and then selecting "samples" in the resulting dropdown menu.
- Output Folder: Clicking the button displaying an empty folder or pressing O will prompt you for a folder to place the new ADX files in. If this is not set, the files will be deposited in the computer's root directory.
- Export: Clicking the "Encode" button or pressing E will convert each WAV file in the list into an ADX file with corresponding audio and loop information.
Note that if imported into the game as-is, the ADX files output by this program will not loop, due to using a different loop specification than the game expects. To remedy this, the use of a hex editor is required. Opening an exported ADX file in a hex editor should result in a similar view to the left side of the following image:

In order to make the ADX file meet the game's standards, three actions are required in the hex editor:
- Change the values at position 0x12 from "04 00" to "03 00".
- Delete 12 (0x0C) bytes of zeroes from position 0x14 onward (the selection should end just before a value of "00 00 00 01").
- Subtract 12 (0x0C) from the value at position 0x02, which indicates the start of the audio data.
After doing this and saving the ADX file, the game will be able to read it correctly, loop data included.
Mod Downloads
See the above sections, particularly the FILELINK.BIN section, for information on how to install these mods.
Audio Edits
Full Translations
penguino + Sasdarl Translation
To install these mods, you will need the program xdelta. Open the program, select the Patch, Source File, and Output File, and click the Patch button.
Resources
Community
Though there is no formal community for Phantom Blood, any forthcoming developments in the modding scene (unlikely as they may be) will likely be posted to penguino's YouTube channel and Twitter feed.
Notes
- ↑ The format of FILELINK.BIN is also applied to the game's model files, which QuickBMS typically applies "nfc" or "sdb" extensions to. In internal filenames, however, they share the same "bin" extension as FILELINK.
- ↑ PGM is an extension assumed and applied by QuickBMS. The header of each file begins with the string "P2TX", and internal filenames for these files use the extension "tex".
- ↑ DAT is an extension assumed and applied by QuickBMS. Internal filenames for these files use the extension "lxe". Note that these files are unrelated to the DAT files in SOUND.AFS, which are given the "dat" extension within the game proper.