User:Nabu/EditorsGuide

|
Note: This is a user's personal page attached to their profile! This is not an actual article, may not be related to JoJo or Araki, and is not associated with the wiki. As such, it may not adhere to the policies. |
THE BASICS
WIKI POLICIES/BASIC RULES
First things first, you definitely should carefully read our policies to know what kind of edit is acceptable on this wiki and what kind isn’t. It is necessary that all editors work on the same pages to smooth editing as much as possible. Here is the link to the policies: https://jojowiki.com/JoJo_Wiki:Manual_of_Style. This page has an exhaustive list of what we consider to be acceptable or unacceptable as far as edits go. Note that you may disagree with some of our policies. This is always up for discussion and you may contact the admins if you have something to say. As a quick reminder, here’s a set of the most basic rules you should follow while editing:
- No speculations. If you’ve only heard about something like “it was fans who asked Araki to bring Avdol back from the dead” but have no credible source that can be traced back to the numerous interviews Araki has done or the manga itself, then don’t add it. Better, talk about it in the forum or in the official Discord server and things should be cleared up rapidly.
- Write in a neutral manner, do not add your opinions to the articles, you can freely express them elsewhere in the comments, the forum, or the official Discord.
- American English is the preferred language on the wiki. Other variants of English are not recommended, and other languages such as Italian, Polish, Chinese or whatever that aren’t English will be erased.
- Try to spell the words right and have grammatically correct sentences.
- Do not modify the categories of a page without consulting the moderators or the admins.
- Images can be modified if you think any image is better, but don’t act surprised if you find that your edit has been reverted later.
- The administrators and moderators are here to help, don’t hesitate to contact them for help.
GETTING STARTED
HOW TO EDIT
There are several ways to begin editing a page. Look at this article.
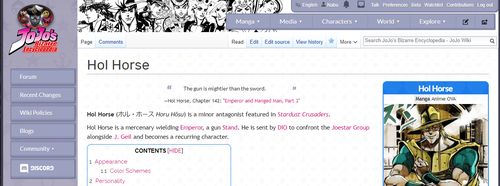
Just above the title, besides the search bar, you have several buttons you can click. “Edit” and “Edit source”.

By clicking on any of the buttons, you will be able to access a special page in order to edit. There more nuances to them, so for now, just click on the “Edit” button.
If in the middle of the article, you feel you should edit it, then it is possible to rapidly access the edit page by clicking the small “edit” links on the right of section titles.
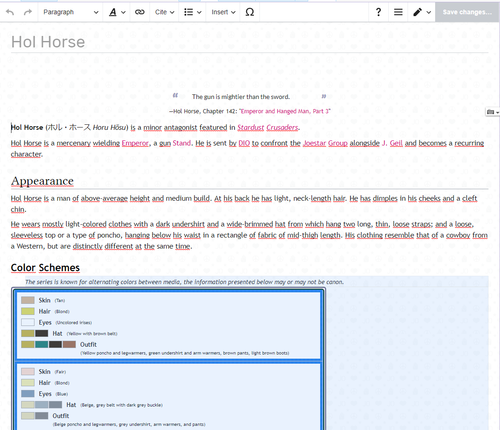
You can now edit the page, modify the texts, the templates in the page, and the images on the article. To stop editing, you can press the ESCAPE button at any point, but if you’ve modified the page since then, a box will appear to confirm whether you want to keep your edit or no.

After you are done editing, then you can save your edits. Note that on the top right, the grey button has become blue, you can click on it now to save your edits.

Another box appears.
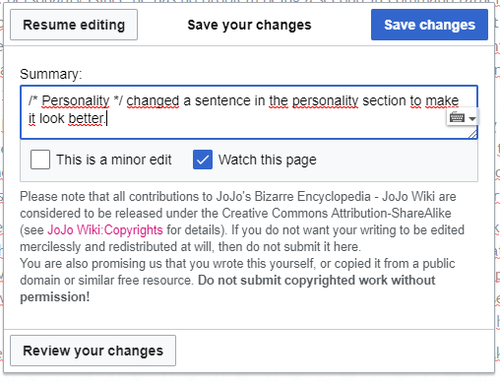
At the center of the box, there’s a summary text zone. In here you can explain what you have done. It isn’t obligatory but helps other editors know what you’ve done in this page and ultimately smoothes how the wiki operates. With the three buttons at the corners of the box, you can either resume editing if you consider that you aren’t done yet, confirm your edits and save the changes you’ve made, or review your changes. Reviewing your changes is important, it allows you to confirm that you haven’t done any mistake while editing. If you click on the “Review your changes” button, then this box appears.
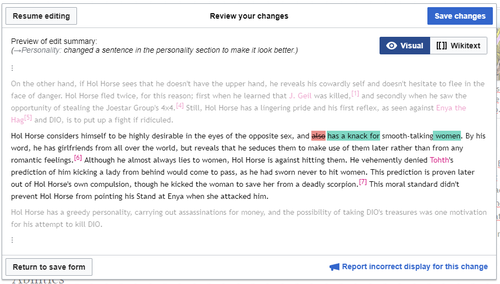
Highlighted in green is the text you’ve added. In red is the text you’ve erased. Once you’ve checked your edits, you can now click on the “Save change” button. You’ve now returned to the readable article and if you want to edit again, you’ll have to click on the edit button again.
BASIC FORMATTING

Clicking the A opens the formatting menu. Bold, underline, strikethrough. This wiki only occasionally uses basic formatting. The only real rule is that the first time the subject of the page is mentioned, notably in the introduction paragraph, the name should be in bold. For instance:
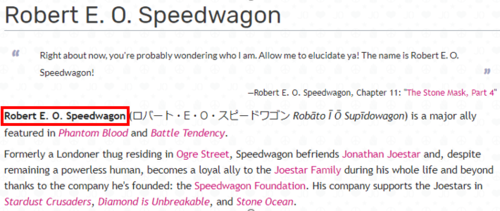
Use bulleted points when necessary.
LINKS

The wiki uses links very often though! There are no real rules for links, it is best that we add links to pages as much as possible, but I recommend a maximum of one link to a particular page per paragraph. The edit header has a very useful button with a chain link icon that will help connect pages between each other. You’ve just mentioned a Character/Stand/JoJo Part in your text, well perhaps it’s something that the readers would want to check out. Best to put a link. We’ll make a link as an example:

. In this example, we’d like to create a link for Crazy Diamond. First, highlight the part of the text you want to turn into a link

Then click on the link button.
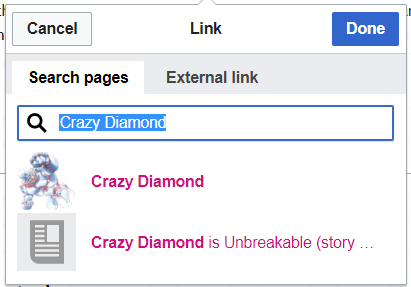
Thankfully, the editor is smart enough to give the most likely option for the link. However, you can have cleverer links. For instance in this paragraph:

“Joseph’s grandson”. Well perhaps a link to Jotaro’s page is in order. After highlighting the “his grandson” and clicking on the link button, there won’t be any links to Jotaro’s page, but you just have to type Jotaro’s name on the search bar to have the option available.
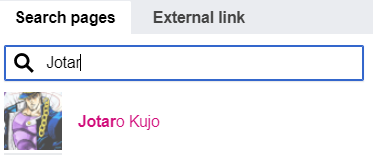
And here you go, now the text links to Jotaro’s page.

EXTERNAL LINKS
Occasionally, you’ll want to link the pages to pages outside of the wiki. We recommend that you don’t abuse them though, as external links can cause dead links down the line. External links are best used for sources or references to official pages related to the franchise. Here is an example:

Say we want to link a specific youtube video in this part. Highlight the necessary text, click the link button. But instead of using the “Search page” tab, click on the “External link” tab and then add the external page’s url to the bar.
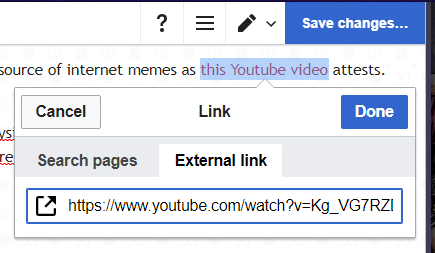
Now, the text should be in another color and have a little icon beside it.
REFERENCES[1]
A wiki is used because it uses credible information. That is why we place special attention on references. For instance:

We can’t have such claim as “Joseph is still alive during Part 6” without having a credible source that everyone can check. Let’s make a link:

I wrote this, but now I want to make this information checkeable. Let’s add a reference. Click on the “Cite” toolbar. This menu appears:
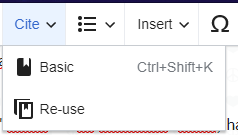
Most of the time, you should use the “Basic” option. Click on it and this box appears.
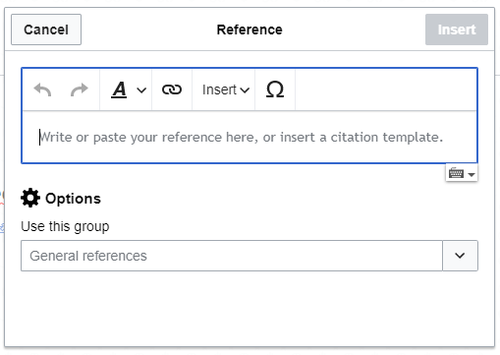
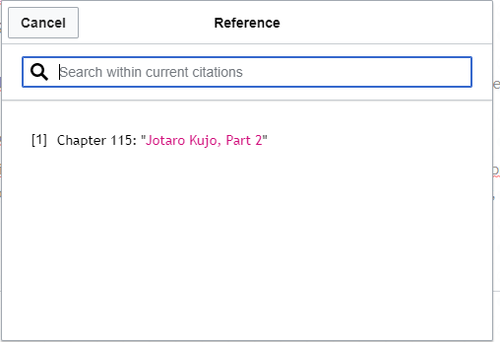
Obey the text, and now you have a reference. However, the article doesn’t know where to put all these references! You should click on the “Insert” tab, add a “Reference list” in an appropriate section if it isn’t already done. Then you can re-use references, which is handy on long pages with lots of them and prevents reference errors. Instead of choosing the the “Basic”option, click on “Re-use” and a list of existing references will be available. Click on the appropriate reference but be careful as immediately clicking on a reference immediately adds it without prompt.
VISUAL EDITOR & SOURCE EDITOR
Differences between them Visual Editor. More intuitive, you directly see how the page looks, managing templates is more difficult. Best for simpler edits. Source editor, lets you see much more information. More complex. Lets you upload multiple files at once. Best for big edits, managing templates. Basics of source editing You can do anything directly. Become familiar with basic source formatting. Optimize Source editing
Switch between editors You can switch with the top right button here.

CREATING PAGES
Not everything deserves a page. New chapters and episodes deserve one. Merchandise that is sufficiently developed deserves one. New Characters should be dumped in the Minor and Unnamed Characters before they gain anymore significance. Typically, Stand Users deserve a page. To create a page, click on this top right button.

Although you’ve created a page, it’s good form to Add a minimum of information to it. Add an introduction text and the general layout. To signal that a page is not finished, it is best to add the Construction template.
PAGE LAYOUT
The wiki uses headings and sub-headings to mark the beginning of a specific section and generally help organize it. Look at this table of content on the left for Battle Tendency’s page. The users can take a quick look at it and see the specific section they want to go to. On mobile, the pages are also folded according to the headings too, on any device, having a well-organized page is important. Most pages follow a standard layout for organizational reasons. If you want to create a page, you should consult this page: https://jojowiki.com/JoJo_Wiki:Page_Layouts to have an idea of the general layout of a page. To make headings or sub-headings, simply click on the top left toolbar there.

It opens a selection of different options.
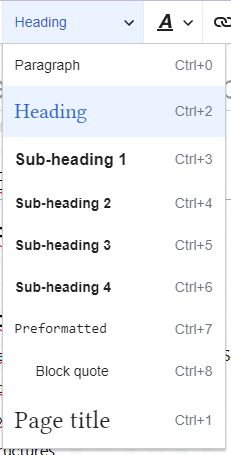
Most of the time, you’re gonna use the “Paragraph”, “Heading” and “Sub-heading 1”. However, don’t hesitate to use the other sub-headings if you feel that the a subject needs special attention within a section. HANDLING IMAGES AND VIDEOS Our wiki isn’t all text. Images are frequently used to quickly illustrate what is said in the texts and thus are an important part of the wiki. We’ll now talk about how to handle them in order to optimize the wiki. Firstly, you should read this page: https://jojowiki.com/JoJo_Wiki:Image_Policy to get you familiarized with what is or isn’t acceptable. There are several rules, but in short, your image should be at least related to JoJo, should come from the Japanese version if there is text, and should be to the point.
ADDING FILES
There are multiple ways of adding files. You can click on the “Upload File” at the top right of the pages. That way you can add files to the wiki, but it won’t be on any page yet. It is possible to add files in the middle of editing. Click on the Insert tab, select the “Media” then “Upload” option to add an image or a picture. Be sure to place the file directly besides the subject it illustrates. Never forget to properly name your files while editing. The name should be related to the subject of the file. However, descriptions are not obligatory. If it recommended to add captions to all images so that users have context. Unless it is in a gallery, images should be in thumbnails. A special page named https://jojowiki.com/Special:MultiUpload allows you to multiple files directly to the wiki. However, it doesn’t add them directly to the pages. You should always says that a files goes under Fair Use. Helps the wiki not get in trouble
MODIFYING FILES
You can modify files. To resize thumbnail, you can click and drag the corners of a thumbnail. To move a thumbnail, click and maintain on the thumbnail to move it, a grey bar indicates its position. Click on the Edit tab. You can add captions. In the “Advanced” tab, decide if it’s to the right or the left. Images should alternate between the right and the left in long texts. About videos, heh don’t have much to say. Most of the time, it doesn’t work.
DIRECTLY MODIFY THE FILES
You can access the file directly. Right click + Open the link. Or go to the url bar and type “File:filename.type”. Not really useful, unless you want to upload a new, better version of the file. Make sure the file is of the same type as the old one.
MANAGING GALLERIES
You can add gallery by clicking on the Insert tab and then Gallery option. A box shows up, you can search for images and add them to the gallery. The search option sucks. While editing, you can still access an existing gallery.
TEMPLATES
Infoboxes Navboxes Other templates
GENERAL INSTRUCTIONS
TABBERS
ADVANCED
History Moving Pages
OPTIMIZE YOUR EDITS
Thinking ahead. Keyboard shortcuts